Nektar++ on the Imperial College HPC cluster
Basic info about the HPC cluster
Imperial College’s HPC system contains computing resources suitable for a broad range of jobs. Node sizes and interconnects therefore vary. This cluster is useful for serial runs, small and large parallel runs, parameter sweep studies, etc. There are also some dedicated private queues which some users may have access.
The official documentation for Imperial College’s HPC systems can be found here:
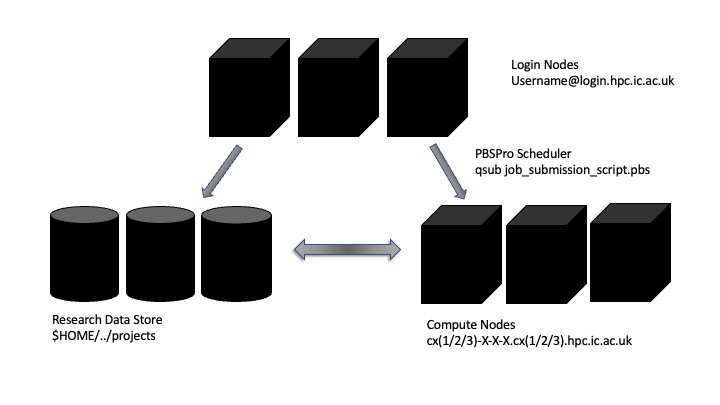
Above is a diagram explaining the layout of the Imperial College HPC machine. It is different to your personal computer or workstation as the interaction, the computation and the storage are disaggregated and distributed across a number of different machines or “nodes”.
When you log into to the cluster you are allocated a shared resource called a login node. There can be many users assigned to the same node – so it is imperative that no resource intensive jobs are run here – this will slow the machine down for all users on the same login node.
The computes nodes themselves are headless – meaning we cannot visually interact with them. Use of them is dictated by a scheduler that allocates resources to jobs according to the availability of nodes and priority and sizing of jobs.
The Research Data Store holds the majority of the storage for the cluster. You are assigned a specific allocation, additional project allocations can be purchased or created through the RCS website.
Access to the cluster
To get access, you should contact your supervisor (see request access for details).
Before you start using the HPC cluster, you are also expected to be familiar with the Linux command line, SSH, and the PBSPro job submission system.
Once your supervisor has given you access, you can log in with your Imperial College credentials by typing the following command into a Linux shell or MacOS terminal
ssh username@login.hpc.imperial.ac.ukImperial College’s HPC cluster is only accessible from computers that are connected to the Imperial College network. If this is not the case, see remote access for more information on how to access the HPC cluster when you are outside campus.
When you access the HPC cluster, you will connect to a login node. The login nodes are shared by all users, and you should therefore not run any compute intensive tasks on these nodes. Instead, the login nodes should only be used to
- Download and compile Nektar++ (
gitworks for cloning) - Prepares a PBS script to submit and run jobs
- Submits the job to the queue
Compilation instructions
Before you start compiling Nektar++, you need to load the following modules
module load intel-suite/2017.6 \
cmake/3.18.2 \
mpi/intel-2019.8.254 \
flex \
fftw/3.3.3-double \
hdf5/1.8.15-parallel \
scotch/6.0.3-nothread \
boost/1.66.0
It is advised that you install Nektar++ in your $HOME directory, which is the directory you enter when you access the cluster using ssh. To organise all your files, you can create a new directory for all your programs
mkdir $HOME/ProgramsYou can now download and install Nektar++ in your Programs directory by following these instructions
- Go to the
Programsdirectory
cd $HOME/Programs- Clone the Nektar++ repository
git clone https://gitlab.nektar.info/nektar/nektar.git nektar++- Create a directory where Nektar++ will be installed
cd nektar++
mkdir build
cd build- If you plan to run Nektar++ on CX1 or CX2, use the following command to configure the build
CC=mpicc CXX=mpicxx
cmake \
  -DNEKTAR_USE_FFTW=ON \
  -DNEKTAR_USE_MKL=ON \
  -DNEKTAR_USE_MPI=ON \
  -DNEKTAR_USE_HDF5=ON \
  -DNEKTAR_USE_SYSTEM_BLAS_LAPACK=OFF \
  -DNEKTAR_TEST_FORCEMPIEXEC=ON \
  -DCMAKE_CXX_FLAGS=-std=c++11\ -O3\ -xSSE4.2\ -axAVX,CORE-AVX-I,CORE-AVX2 \
  -DCMAKE_C_FLAGS=-O3\ -xSSE4.2\ -axAVX,CORE-AVX-I,CORE-AVX2 \
  ..
If you only want to compile a specific solver, or further configure the build, you write ccmake [FLAGS] ../. For details on how to configure Nektar++, see the user guide available on https://www.nektar.info/getting-started/documentation.
- If you plan to run Nektar++ on the new CX3 nodes, which use AMD processors, use the following command to configure the build
CC=mpicc CXX=mpicxx cmake \
  -DNEKTAR_USE_FFTW=ON \
  -DNEKTAR_USE_MKL=ON \
  -DNEKTAR_USE_MPI=ON \
  -DNEKTAR_USE_HDF5=ON \
  -DNEKTAR_USE_SYSTEM_BLAS_LAPACK=OFF \
  -DNEKTAR_TEST_FORCEMPIEXEC=ON \
  -DCMAKE_CXX_FLAGS=-std=c++11\ -O3\ -mavx \
  -DCMAKE_C_FLAGS=-O3\ -mavx \
..- After the build has been configured using
cmake, you can compile the code
make -j4 installNote: Do not run regression tests as usual on the login node, as the parallel tests will not be allowed to run. Instead, follow the instructions below.
Running regression tests
It is not possible to start the regression tests on the login node. Instead you must submit a job using the following script
#!/bin/sh
#PBS -l walltime=0:30:00
#PBS -l select=1:ncpus=2:mpiprocs=2:mem=1024mb

# Path to Nektar++ installation
NEKTAR_BUILD=$HOME/Programs/nektar++/build

export LD_LIBRARY_PATH=$LD_LIBRARY_PATH:${NEKTAR_BUILD}/ThirdParty/dist/lib

module load intel-suite/2017.6 cmake/3.18.2 mpi/intel-2019.8.254 flex fftw/3.3.3-double hdf5/1.8.15-parallel scotch/6.0.3-nothread boost/1.66.0

cd $PBS_O_HOME/${NEKTAR_BUILD}
ctest | tee reg_output.txt
cp reg_output.txt $HOME/
Assuming the script file is runtests.pbs, you can submit a job to run the test as follows
qsub runtests.pbsThis submits the regression tests job to an execution queue. Check the status of your job(s) using
qstatYou will find the results of the regression tests in the reg_output.txt file which has been copied in your $HOME directory.
The PBS queue system will execute your job once resources are available.
- Resource allocation: memory, runtime, number of nodes
- $HOME, $WORK, …
Running jobs
To execute Nektar++ in parallel on the HPC cluster, you need to create and submit a PBS script. The PBC script tells the queue system or scheduler which resources you need, how long your simulation will take, and how to execute your code. Depending on your job size, there are six main queues that your job will be assigned to:
- High Throughput
- High End
- High Memory
- GPU
- Large
- Capability
Several other queues are available, depending on department and research undertaken. Running qstat with the -q flag will list all available queues. Under state S means the queue is suspended whereas R means the queue is operational and running.
Your job is automatically assigned to one of these queues based on the resources you request at the top of your PBS script.
#!/bin/bash
#PBS -l select=N:ncpus=X:mem=Ygb
#PBS -l walltime=HH:MM:SS
Here, N denotes the number of nodes, and X the number of processors per node (X=24 or 28). The total number MPI processes that will be launched is therefore Y = N*X. Your selection of N and X, the amount of memory requested, and the requested wall clock time, determines which queue your job is put into. For further documentation, see job size guidance. Most jobs as suggested will use either 24 or 28 core nodes. For capability jobs (i.e. 72+ nodes) 28 core nodes should be specified. Otherwise, specifying 24 is preferred to not limit the hardware the scheduler will allocate.
After you specified the resources you need, you need to make sure all modules are loaded. To do this, simply add the following lines to your PBC script
# Load modules
module load intel-suite/2017.6 cmake/3.18.2 mpi/intel-2019.8.254 flex fftw/3.3.3-double hdf5/1.8.15-parallel scotch/6.0.3-nothread boost/1.66.0
These are the same modules as we loaded before when compiling Nektar++.
Next, we will create symbolic links to the input files
# Link input files to temporary directory
ln -f -s ${PBS_O_WORKDIR}/*.xml ${TMPDIR}
ln -f -s ${PBS_O_WORKDIR}/*.rst ${TMPDIR}
ln -f -s ${PBS_O_WORKDIR}/*.nekg ${TMPDIR}
The environment variables $PBS_O_WORKDIR and $TMP_DIR point to the directory where you submitted the job and the local directory where the cluster executes your code, respectively. Therefore, if you submit the job from the directory where you store all the input files to Nektar++, you can make sure that the cluster knows where to find your input files without having to specify absolute paths.
Finally, we will add the actual command for executing Nektar++
# Setup Environment Variables
NEK_PATH=$HOME/Programs/nektar++
INC_SOLVER=$NEK_PATH/build/dist/bin/IncNavierStokesSolver
COMP_SOLVER=$NEK_PATH/build/dist/bin/CompressibleFlowSolver
JOB_NAME=name-of-input-file

# Export Third Party Libraries
export LD_LIBRARY_PATH=$LD_LIBRARY_PATH:$NEK_PATH/build/ThirdParty/dist/lib

# Execute Nektar++
mpiexec $INC_SOLVER ${JOB_NAME}.xml --io-format Hdf5 > $PBS_O_WORKDIR/output.txt
Note that you don’t have to specify the number of MPI processes. If you don’t use the HDF5 I/O format, you can also remove the associated flag.
Once the job is finished, you need to move results back into the directory where you submitted Nektar++. To do this, add the following lines to your PBC script
# Copy results back
rsync -aP ${JOB_NAME}*.chk $PBS_O_WORKDIR/
rsync -aP ${JOB_NAME}.fld $PBS_O_WORKDIR/
To submit your job, change directory to the directory where the input files for Nektar++ are stored. After this, run the following command
qsub ~/job_script.pbsHere, we assume that the PBS script file is called job_script.pbs, and that it is stored under the $HOME directory.
Additional documentation for PBS job scripts
Specifying number of MPI processes/node
Specifying a particular number of MPI processes/node is trivial through the use of the mpiprocs PBS option:
#!/bin/bash
#PBS -l select=3:ncpus=12:mpiprocs=2:mem=1024MB:icib=true
#PBS -l walltime=00:30:00
This will request three 12-core nodes with infiniband, but spawn only two MPI processes on each of the nodes for a total of 6 processes. This is useful for when shared-memory parallelism is implemented.
Specifying email to be send when job’s status changes
It is possible to receive emails when the job status changes in the queue via `m’ setting:
#!/bin/bash
#PBS -m abe
#PBS -M user_email_address
Here an argument to -m setting is one or more of the characters {n,a,b,e}:
- a — send mail when job is aborted,
- b — send mail when job begins,
- e — send mail when job terminates.
The default is “a” if not specified.
Checking on the status of your job
To check on the status of your job you need to log to the node that is running your job. To find this out you first type
qstat -u myusernameTo identify the job ID MyJobID then type
qstat -f MyJobIDThis will return details of your running job. In this information there is an item called exec_host which tells you which nodes your job is running on, i.e. cx1-135-19-1
To check the estimated start time of larger jobs – the -T and -w flags may be useful. For example:
qstat -T -wNext ssh into this run and cd /tmp/pbs.myJobID.cx1/ and you find your job executing on this node.
MPI Debugging
To check what resources are being allocated and which ranks to which nodes, etc, specify the following before calling mpirun.
export I_MPI_DEBUG=100Not the use of pbsdsh2 is a distributed shell command to ensure that each node gets a copy of the appropriate input files. The \ prior to * is necessary to escape the asterisk and ensure it is not expanded by the shell when passed through pbsdsh2.